Birdsong Bows

Monday, March 4, 2013

Free Instructions: How to sew a jacquard ribbon headband

I love jacquard ribbon - the complex textures are beautiful, and it feels wonderful to work with! But it doesn't act like common grosgrain or satin ribbon, so I was often at a loss about what to make with this fantastic type of trim. Of course it can be used as trim for clothing and other accessories, but I wanted to make some projects that would allow the jacquard to stand on its own! This is the first in an occasional series of tutorials about how to use jacquard ribbon.
We're making a 1 1/2-inch wide jacquard headband. You'll need:
* 1 yard of 2-inch wide (or 1 7/8" as mine was) jacquard ribbon
* Scrap of matching cotton fabric that can be cut to the same size as your ribbon
* A 1-inch-wide plastic headband
* Sewing machine and basic sewing supplies
* Iron
* Tube turner or safety pin
1. Start by cutting your beautiful jacquard ribbon to a length 2 inches longer than your headband (photos below). I bought this pretty Amy Butler print from the Renaissance Ribbons retail site.

2. Cut your cotton fabric to the same size as your jacquard ribbon.

3. Pin these right sides together. Sew just 1/8" from the edge around three sides. Leave one side open (you'll need to insert your headband)!

4. Turn your tube right side out using a tube turner. These can be purchased at any sewing store and they come in a pack with a variety of sizes. They're easy to use!

5. Using a warm iron (you'll melt your ribbon if your iron is too hot), press. The ribbon will tend to puff up, so press and pin the top to the bottom, making sure your bottom layer of cotton is completely hiding underneath. Topstitch just 1/8" from three edges, leaving the top open. Slide onto your plastic headband.

6. On the open edge of the headband, fold your fabric to the inside and carefully topstitch the opening shut. Enjoy your unique headband!


Labels: , ,

Friday, April 20, 2012

Free bow instructions: Decorating a picture frame with ribbon


I had my youngest daughter's photo in this plain brown frame, and decided it was time to dress it up! This project is great for an existing, plain frame in your home, or as a wonderful project to give to an expectant mother of a baby girl.


Supplies you'll need, in addition to the frame:
Hot glue gun/glue
Hand-sewing needle/thread
A small amount of one or two 7/8"-wide ribbons; at least one should be the same on both sides.
A way to seal your ribbon, either Fray Check or a wood-burning tool

Directions
Warm up your glue gun. Decide how long you want the borders to be, and cut two lengths of ribbon to this length. Mine are 6" for a frame that holds a 5x7 photo (below):


Seal the ends of the ribbon, and glue to corner as shown. I also did a "V" cut in the ribbon along the part that will show:


Thread your needle and knot the end, then set aside. Take your ribbon (still on the spool), and seal the top edge. Create a six-loop tuxedo bow, as shown in the photos below, by folding back and forth ... you may have made bows like this for packages, because they're so simple. Note: This folding process will not work with printed ribbon, since it's not the same on both sides. Start with the smallest two loops, and keep folding larger loops until you have three on each side:


When you're finished folding, cut and seal the ribbon on the back, then sew the bow together in the middle:


Cut a piece of ribbon to 2 1/2 inches long, and seal both ends. Fold over the center of the bow and glue to the back:


Glue to the corner of your frame (see first photo in post), and you're done!


Labels: ,

Wednesday, March 2, 2011

Free Hair Bow Instructions: How to "print" your own ribbon

Have you wanted to create your own made-to-match ribbon -- or have you seen it from other designers -- and just don't know how to do it? This quick, simple process allows you to print your own designs on ribbon!
If you've got graphic design skills, you can design your own graphics in strips to be applied to ribbon. If, like me, you're a little lacking in that category, there are several graphic artists who sell sheets of ribbon graphics in PDF format that you can print from you own inkjet printer. One of my favorites is Carol, of TicTacTogs -- her designs are amazing and she's already "reversed" the patterns for you, so you can apply them directly to the ribbon.
Supplies needed:
Inkjet transfer paper, seen below. I picked this up at my local big-box retailer, but it's also available at all craft stores. Purchase the lightweight kind for use on T-shirts. If you print on dark ribbon (which is unusual) you'll need to buy the dark-colored transfer paper. But I usually print on light-color ribbon, so I have this:


You'll also need:
A standard inkjet printer
A sheet of ribbon graphics
An iron
A flat, hard surface and possibly a thin, flat hand towel or pillowcase to protect it - nothing fluffy!
Ribbon (usually 7/8-inch ribbon)
Scissors for both paper and your ribbon (I use separate scissors for my ribbon to keep the blades sharp!)

Instructions
Create a graphics page or buy a page of ribbon designs from a graphic designer. Here are the selections from TicTacTogs (wow, I just saw the sock monkey print; how deadly cute is that??)
Following the directions in the ribbon transfer package, print your sheet on an inkjet printer.


Using your paper scissors, cut the strips apart. My 10-year-old graciously modeled her hands for this tutorial.


Following the directions in the package (which involves removing water from your iron), iron your strips, print side down, onto your ribbon. Don't use an ironing board; use a flat surface and press firmly with a hot iron. You can put a thin cotton hand towel or pillowcase down to protect your surface.


Peel off the paper back, and voilå, you have your own printed ribbon! In this example, it looks like I could have pressed the image a little longer, but my daughter was getting impatient and she was the diva model, after all (grin). When you need to create longer ribbon, make sure you carefully line up your image strips so they match the pattern. Let your ribbon "set" for a day, but after that, it's washable.


Enjoy making your own printed ribbon! Use this for hair bows, key fobs, tags (you can print tags with your child's name and sew the ribbon into their clothing for school), and any other embellishment that requires ribbon!


Labels: , ,

Saturday, January 22, 2011

Free Hair Bow Instructions - Quick way to make spikes for layered boutique bows


The gal who works as my "hand model," Laura, came by on Thursday evening so I could take photographs for an upcoming e-book (the above photo, of course, is NOT Laura, but sweet Olivia, modeling for A Hope and a Wish Photography). Someone asked me once if Laura is a hand model because she's not attractive enough to be a "real" model, LOL! Truth is, Laura is a very pretty first-grade teacher who does this on the side for me. It's too dark in my house at night to take a flattering portrait photo, but I'll take one soon of Laura and post it. She thought it was funny that someone would assume she was less-than-facially-blessed.
So while she was here, I shot some photos of this really simple way to make spikes for layered hair bows. I normally make my cuts freehand, but this is quick and simple and I might do it this way more often! Hope you enjoy this quick tip.

Supplies
"Spikes" of 7/8" ribbon in the size you desire
Scissors
Heat-sealing tool, like a lighter or woodburner

1. Fold your spike in half length-wise, as shown below.


2. Make a cut from the outside, "free" edge and angle it down toward the folded edge.


3. Open the ribbon and marvel at your FABulous skills with the scissors.


4. Seal the ends with your choice of sealing equipment (lighter or woodburning tool, shown below). I'd move my thumb a little farther away from the heat, but truth be told, the woodburner wasn't on here and I'm counting on the use of your imagination that it "could" be on.


Complete this with both ends of all of your spikes, and voila, perfectly formed pretties for your layered boutique bows! This tip is an addition to my PDF e-book instructions on how to make layered boutique bows.
And DON'T forget! Click in the right-hand column here to be a follower on this blog. I'll select one of the followers to win a FREE tutu tutorial on Sunday night, and will announce the winner Monday morning. Contest ends at 10 p.m. U.S. Eastern time on Sunday, Jan. 23. Good luck!

Labels: , ,

Thursday, January 13, 2011

Free Hair Bow Instructions - How to make simple bow holders

Whether you love to purchase hair bows or make them yourself, you'll soon discover that your little ones' dresser drawers are no longer good places to store them! Aside from getting crushed, the bows begin to clog the drawers and sometimes (yikes!) get mixed up with her markers, crayons and pencils. There are some very beautiful bow holders available, but if you have limited wall space (or limited time to make something extra special), then these simple bow holders are for you. I sew mine, but you can just as easily use hot glue if you don't have a machine.
Supplies
Scissors
32 inches (81.3 cm) of 7/8" ribbon
32 inches (81.3 cm) of 3/8" ribbon
A 1-inch size D-ring (available online at ribbon stores like The Ribbon Retreat)
Hot glue gun and glue OR sewing machine and basic sewing supplies


1. Cut your ribbons to size, and layer the 3/8" ribbon on top of the larger ribbon.
2. Fold the ribbon over the flat side of the D-ring, about 1 inch (2.25 cm).
3. Sew the ribbon in place horizontally, or hot glue it to the back.
Don't attach the 3/8" ribbon vertically down the middle. The smaller ribbon is there so you'll be able to add small clippies that won't fit on the larger ribbon!


Hang the bow holder on your wall, and enjoy!
Seller tips: Seal all ends. If you plan to market these, you can add a hair bow to the top of the holder to make it prettier and entice customers to buy. Another idea - give these simple bow holders away as free gifts for customers who place large orders OR as an incentive for people to buy some of your more expensive bows.


Labels: , ,

Saturday, December 18, 2010

Free Hair Bow Instructions - How to make easy no-slip grips

Sometimes I get requests to add no-slip grips to my bows, to help them stay in fine baby hair. There are several different ways to do this, but this method is easy, neat, and very inexpensive!
I didn't use the white background like I do in my hair bow instructions and pdf tutorials, but this is still clear and easy to see on my cutting mat!


Supplies:
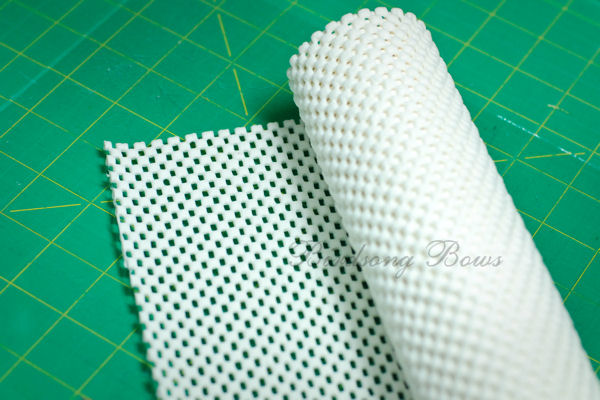
*A roll of shelf liner, available at any big-box retail store. You can get "Easy Liner" or any similar brand, which is like a ridged, compressible foam. It's usually under $5 per roll.
*A double-prong pinch clip (single-prong will work as well)
*Hot glue gun and glue
*Ruler
*Scissors or rotary cutter and mat


1. Cut a 1/4" strip of the shelf liner from end to end, like this:


2. Now, cut this into 1-1/4" sections, as below:


3. After mounting your clip to the back of your bow, simply glue the shelf liner strip to the bottom inside of the pinch clip. Make sure you glue it securely from end to end, and you'll have to hold it open for about 30 seconds to make sure the glue doesn't seep through and glue your clip shut!! (that would defeat the purpose, wouldn't it!)


And that's it! It's such a simple method of creating a no-slip grip, and the shelf liner can be purchased in other colors and textures if you're looking to coordinate with your bows. There are other methods of creating no-slip grippers as well, and I'd love for you all to share your ideas!

Labels: , ,

Tuesday, August 17, 2010

Full Bowmaking Tutorial Line is here! Includes Funky Loopy bows!


It's been a nice, wonderful summer, and I've spent a majority of it finishing up the final touches on my e-book tutorials on making hair bows!

You can purchase the entire Platinum collection from my website for $21.99. This includes books on how to make korker bows, how to make boutique bows (includes all sizes of bows and bowbands, including beautiful multi-layered bows!), and "funky loopy bows." If you already know how to make some of these types of bows, you can also order the books individually. :)

For those who want to sell their work and are just thinking about doing online sales, I've written a fourth book, called "Smashingly Successful Online Sales." This will take beginners through the ins-and-outs of selling online. You can also purchase this on my website.

With the kids returning to school, I will finally have time to work on my holiday bow line! Please look for it within the next couple of weeks!

Labels: , ,