Birdsong Bows

Wednesday, July 10, 2013

Free Tutorial: Gathering fabric using clear elastic


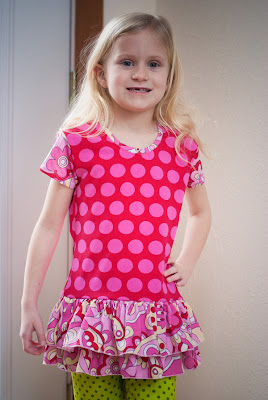
I enjoy sewing with woven fabrics for a variety of projects, but love knits for kids' clothing because they're so comfortable. I particularly enjoy Ottobre magazine for their multitude of easy-to-wear but still funky patterns for kids. I decided to pair their Lucky Cat pattern in the Spring 1/2013 issue with some Birdsong Comfy-Fit Leggings. The Ottobres can be a little intimidating at first - lots of pattern pieces per page, no seam allowances, and to-the-point instructions. But the fit is great on most designs and, oh, the eye candy in each issue!


Key to sewing up this design is the use of clear elastic to gather the fabric at the empire waist, to gather the sleeve caps and sleeves, and to gather the bottom before the addition of the hem band. Clear elastic works great for gathering, and it's a tool you'll want to use...there are a few tips that you won't learn from Ottobre.

First, measure the section to which you're attaching your gathered fabric - not the fabric you're going to gather. Stretch your clear elastic (I buy mine here) a few times to loosen it up, and cut it 2-3 inches (5-8 cm) longer than what you've measured. Using a Sharpie, make three marks on the elastic - about an inch from one edge, then from that mark to the measurement you're trying to achieve, and then in the middle (which you will figure out by folding it in half, meeting the two marks you've drawn, and marking the half-way point). What you don't want to do is cut the elastic to the exact size to begin with - you want an inch or so on each end so you have something to hold onto.

(I should know - I muttered a few expletives when I tried to gather the sleeve caps on this pattern without cutting the elastic longer than recommended, and marking as suggested above.)


Now mark the middle of the piece of fabric you want to gather (not the piece you just measured! Set it aside for now), and place a pin or a snip there (below).


Line up your elastic with the first mark on the edge of the fabric to be gathered, on the right side of your fabric. Don't worry; this is in the seam allowance and you won't see it later. Take a couple of basting stitches on your sewing machine. Now continue to baste - stretching the clear elastic, not the fabric - until the middle marks on the elastic meets the middle mark you've pinned in your fabric. Once you make it to the middle, keep stretching the elastic until you get to the mark at the end. If you have a larger piece of fabric, you may consider making marks at the quarter points.


You'll see the fabric start to gather as you baste. Once you reach the end, the fabric should be gathered to the width of the piece to which you're attaching it:


In the sections about sewing the sleeves, the instructions will tell you to gather the sleeve cap to 8 cm (about 3 1/8 inches) from notch to notch - this is where you'll definitely want to cut your elastic about 14 cm (5 1/2 inches) so you have room to maneuver your fingers to keep the stretch. Be sure to mark the 8 cm/ 3 1/8" on the elastic so you know where to start and stop, though.

That's all there is to it! Of course you can always gather using gathering stitches, but clear elastic is an easy, professional way to go and is quite quick once you get the hang of it. :) An aside - in the photo below I'd like to say my daughter is jumping for joy because of the ease of using clear elastic to gather, but it's because she saw a cement truck drive down the street - a neighbor is getting a new driveway - and she declared that "Spinny trucks are my favorite!" Oh, the days when we were so easily amused, right?


I loved the fabrics for this pattern, by the way. The main print in the top is Lillestoff Scandifruit (for those who don't mind splurging on great knits...I sized up on this top so she can wear it next spring/summer mainly because of price). The accent fabrics and legging fabrics are from Eurogirls Boutique. And the hair flower is the felt version of the Camellia flower pattern.

Labels: ,

Monday, July 8, 2013

New pattern - The Lakeshore Halter!

Just as summer in the U.S. gets its hottest - a new summery outfit to sew! The Lakeshore Halter Dress comes in sizes 2T-8 and is designed for knit fabrics:


The testers came up with so many different fabric combinations, and some also added other embellishments. This one is from Lil Bubs Couture - Luong added some lace and trim to the bodice (not included in the pattern):


And here's a back view of the dress from Kelly, in a a great nautical print:


Nichole's sweet girl from Bluebird & the Boy shows how cute this dress looks when twirling:


And Kimberly's daughter looks so cute in this retro poodle skirt version (applique is not included in the pattern)!


I really enjoyed the entire tester team of 14 great sewists!! And I can't wait until the next pattern and the next round of testing. It's so fun to see what everyone creates. :)

Labels: ,

Wednesday, June 19, 2013

New pattern in the works: The Lakeshore Halter Dress


So I've been a bit absent lately but I've had a good excuse - it's not one I'm able to share quite yet, but it's an exciting new venture for me and I'll share when I'm able. But in addition to that, I've also been hard at work on my next pattern, designed for knit fabrics: The Lakeshore Halter Dress.


This pattern will be available in size 2T-8 within the next couple of weeks. A great team of testers will be getting the pattern within a few days. I can't wait to see what fabrics they choose for it! This dress is best made with lighter jersey knits (7-10 oz); knits that maybe aren't as suitable for tees or other applications - you know the ones...the ones you expected to be a little more substantial when you ordered them but then found out they were a bit light!  But since the front bodice is lined and the dress needs to be light and drapey, it's perfect for those lighter fabrics.

In the meantime, for those of us in the U.S.....bring on summer!!


Labels: ,

Thursday, April 11, 2013

Free Tutorial: How to Sew with Knits Part III: Sewing hems


Love 'em or hate 'em, hems are a fact of life when sewing garments! Although most knit fabrics do not fray - and sometimes you won't want to or need to hem - there are also times when a design calls for a finished hem. Today we'll learn how to sew hems with knits.

If you haven't seen the other parts of the "How to Sew with Knits" series and want to get started sewing with knits, please see "Part I: Getting Started!" that teaches how to choose and lay out your knits and patterns, and "Part II: Sewing Seams with Knits", which will take you through the basics of sewing.

You can read "Sewing Hems on Knit Fabrics" through the Google Viewer (photos are more clear once you've downloaded from the viewer) and get started practicing! If you have a garment ready to hem, practice on a scrap piece of the same fabric first, to be sure you'll get the results you want.

If your browser isn't compatible with the Google Viewer and you're having trouble retrieving "Sewing Hems on Knit Fabrics," feel free to download the tutorial from the Internet.


Labels: ,

Thursday, March 28, 2013

Free Tutorial: How to Sew with Knits Part II: Sewing Seams

Last week we learned how to get started with knits, by looking at fabric types, learning about stretch, and discussing how to prepare and cut your fabric. But now it's time to sew! Sewing with knits can seem intimidating, but it needn't be - they're just different, and require different sewing techniques than wovens do.
Today we'll learn how to sew seams on knit fabrics. There are tips for sewing with your regular sewing machine (as long as it has a zigzag option) and for your serger. You can read "Sewing Seams with Knit Fabrics" through the Google viewer (photos are more clear once you've downloaded from the viewer) and then get started finding out what works best for you. Remember that knits don't fray like wovens (most knits, anyway!) so you won't have to worry about seam finishes. Practice on a variety of knits, and even consider recording what settings work best with the different types of knits you try. In early April I'll post a free headband/flower tutorial for you to apply your new skills! And later I'll teach you how to sew perfect hems, work with clear elastic, and insert regular elastic for twist-free waistbands.
If the Google viewer version of "Sewing Seams with Knit Fabrics" isn't cooperating with your browser, you may also download the file from the Internet directly. So put your stretch needle on your sewing machine, load it with polyester thread, and have fun this week!

Labels: ,

Wednesday, March 20, 2013

Free tutorial: How to Sew with Knits Part 1: Getting started!

I've developed a love for sewing with knits. And I think my excitement was heightened when my daughter put on one of my creations and said, "This looks just like something from a store!" I know what she means, of course - it's not that we don't buy wovens in stores or that our woven creations look shabby. But many (ok - most) of the easy-to wear, drapey and comfortable clothes our children wear are sewn from knits.
And yet, as sewists, we're often afraid to try to sew them ourselves.
There's no need to be anxious! Sewing with knit fabrics is different, but it's not necessarily more difficult. You can use a regular sewing machine (as long as it has a zigzag) and create beautiful, fun, and functional garments. So, let's get started!
This week, we're taking a look at fabrics, stretch, and tools you'll need to get your patterns cut and ready for sewing. Spend a little time reading "Getting Started with Knits" (the photos are more clear once you download than they are in the Google viewer), and shop around for some fabrics to get started with! I love Nature's Fabrics for their vast selection, as well as Fabric.com and Euro Girls Boutique, to name just a few.
Next week we'll discuss how to sew with knits using your regular machine (and serger, if you have one - but it's not a requirement).
If your system doesn't want to open Google Docs to view "Getting Started with Knits," you can download the file from the Internet. Enjoy your new sewing adventure!
For Part II, sewing seams with knits, please see this post!

Labels: ,

Friday, September 14, 2012

Sewing, rather than shopping

I've never really loved clothes shopping. I know I'm in the minority (among many women, anyway), but the nicely-cut clothing is usually out of my price range, and being petite, clothes are often either too long, or too wide. And lately, because the price of cotton has skyrocketed, the cotton on T-shirts has become miserably thin, and I'm thinking: I'm paying *that* for *this?*
Our girls also tend to gravitate toward looks that are expensive -- but looks that are totally accessible for me to sew. So I've made a loose commitment to sew most of the new clothes for my daughters and I...probably not jeans and bras, but I may even give underwear a "whirl."
I'm particularly interested in sewing with knits, because they're so comfortable and easy to wear! Sure, they're different to sew, but with a few modifications (and continued learning on my serger), the results are very professional! As I go along I'll share some tips and techniques.
My youngest daughter loves to wear skirts, but still enjoys jumping around, upside down (exposing her underwear!) so I started with sewing up several pairs of leggings in different lengths. The pattern is from Patty Young's book, "Sewing ModKid Style." I used some cotton rib knit with Lycra that I had available from former baby headband projects. This fabric is perfect for leggings, because the Lycra, or spandex, helps the fabric bounce back into shape around the knees.
Jo-Ann Fabric and Craft Store had some cute and inexpensive knit fabric to use for a twirl skirt (pattern also available in Young's book).
I plan to make a funky T-shirt as well, but right now the leggings and skirt match wonderfully with one of my daughter's monkey T-shirts. I might change out the sleeves with the dot print, though - it would really tie everything together and add to her girlish funky style!


Labels: ,